
Back to HOME
Back to LE FEU SACRE
Back to LE FEU SACRE
This weeks foray into the world of 'Le Feu Sacre' saw a cavalry bash around the fictional village of
Liebertwallywitz.
The table was a small affair, some 4' x 3.5', featuring a road junction, some hedges and walls, a
couple of copses, a low hill, a stream, boggy ground, and the small village of Liebertwallywitz itself.
Although small the write up is quite detailed offering, hopefully, a good insight to this excellent set
of rules.

Orders of Battle
Nige’s French
[c2,400 Infantry, 18 guns, c3,200 Cavalry]
C-in-C – SOLID (DAv, LFS +1)
Light Cavalry Division [1,600 Cavalry] – ABLE/SOLID (DAv+1, LFS +2),
Enhanced Recce Status
Bde
Chasseur a Cheval Regt C Class Light Cavalry
Provisional Chasseur
a Cheval Regt D Class Light Cavalry
Bde
a Cheval Regt D Class Light Cavalry
Independent Dragoon Brigade [800 Cavalry, 6 guns] – SOLID (DAv-1, LFS +1)
Two Dragoon Regt C Class Line Cavalry
Horse Battery B Class 6 x 8lb Medium Guns HA
Independent Polish Division [c2,400 Inf, 12 guns, 800 Cavalry] – SOLID (DAv, LFS +1)
Bde
Polish Line 1 Btn B Class Sk 2
3 Btn C Class Sk 1
Foot Battery C Class 6 x 6lb Medium Guns
Polish Horse Battery C Class 6 x 4lb Light Guns HA
Bde
Two Regts Polish Uhlans C Class Lancers
FAKE (DAv) Enhanced Recce Status
Kev's Austrians
[9 Btns, 7,800 Inf, 18 Sqdns; 2000 Cav, 3 Btys; 22 guns]
C-in-C - BOLD/SOLID (DAv-1, LFS +1)
Infantry (Light) Division – SOLID (DAv, LFS +1)
[5 Btns; 4200 Inf, 1200 Cav, 16 guns]
Bde
Grenz Regt 2 Btns C Class Sk 2
Two Hussar Regts C Class Light Cavalry
Dragoons B Class
Foot Artillery C Class 8 x 6lb Medium guns
Bde
Line Battalions 2 Btns* C Class Sk 1
2 Btns D Class Sk 0
Foot Artillery C Class 8 x 6lb Medium guns
Independent Grenadier Brigade - CAUTIOUS/SOLID (DAv-1, LFS +1)
[4 Btns; 3,600 Inf, 8 guns]
Grenadiers 4 Btns B Class Sk 0
Foot Artillery C Class 8 x 6lb Medium guns
Independent Kurassier Brigade – CAUTIOUS/SOLID (DAv-1, LFS +1)
[800 Cav]
Two Kurassier Regts C Class Heavy Cavalry
FAKE (DAv)
Cards/Chips
French C-in-C Austrian C-in-C
French Commander 1 Austrian Commander 1
French Commander 2 Austrian Commander 2
French Commander 3 Austrian Commander 3
French Commander 4 Austrian Commander 4
French Grand Tactical Cautious Commander
French Reconnaisance Bold Commander
I rolled randomly for the commanders using the LFS automated character generator (26.1). This is
a very useful aid for quick one off games. Once again a proliferation of Cautious commanders on
the Austrian side revealed their weakness.
A few quick notes upon the LFS system are required I believe for those unfamiliar with this excellent
set of rules.
In LFS, on-table both sides are initially represented by 'Blinds'. These represent the Grand Tactical
aspect and general location of units but not the identity of their units. Commanders can spot blinds
to establish the identity of such blinds. Once spotted the figures are placed upon the table. Blinds
can be column of march (4" frontage by 8" depth), semi-deployed (8" x 4") and fully-deployed (16" x
4") reflecting the general nature of their troops.
Blinds cannot change their status from column of march to fully deployed in one turn.
A big mistake by new players to LFS is to allow your blinds to be spotted whilst in column of march
or semi-deployed. Troops spotted in such formations must be deployed in a series of columns in
base to base contact and necessitating PIPs to be spent deploying properly (individual units in LFS
must have a gap of 1" minimum between them), upon their Commanders card being drawn from the
pack.
Blinds can move 8" if in Column of march, or 4" in an other formation, but are allow multiple moves
if formed enemy are not within 16".
As with IABSM dummy or fake blinds can be used to create fog of war. However, in LFS it is
recommended that such blinds do not exceed 20%. For this game I allowed one per side.
Each Division, or Independent Brigade, is alloted a number and commanded by a General whose
identity is unknown until he is spotted by the opposition.
Also in common with IABSM the LFS system features a drawn card system. Each Commander has
a card (or alternatively poker chip) placed into the pack (bag for chips) which activates his
command each turn. National characteristics chips can be added for flavour.
'French Grand Tactical' allows a C-in-C to activate any blind that has not taken its turn yet to do so.
'Cautious Commander' followed by the next cautious commander prevents any movement by that
commanders troops other than artillery fire and rallying.
The 'Reconnaisance' card is an optional one for games where basically there is a significant
proportion of light troops, usually over 50% of the total. Blinds with enhanced Recce status can
make an additional spot and move but not initiate combat. For this game the only unit with a
substantial amount of light troops was Nige's Light Cavalry Division. I decided to award enhanced
status too to his fake blind, therefore protecting the identity somewhat of his light cavalry, forcing
me to spot to identify which blind is which.
'Bold Commander' card means that if any commander is rated as bold he MUST take his turn when
this is drawn.
LFS differs from IABSM in that spotting is limited to only one attempt per turn and must be at the
beginning of a turn; no move and spot here folks! Also spotting is from the Commander figure not
individual units. It is therefore important that the commander is in a position to see, i.e. not behind a
hill!
Although card driven the LFS system differs substantially from that of IABSM in that there is not
'Tea Break'. In LFS the WHOLE pack of cards is played through each turn.
Units activate under LFS using PIPs which generally are required to move Brigades of individual
units. Each commander rolls an average die (2,3,3,4,4,5) removing one from the score if Poor, or an
idependent Brigade, and adding +1 or indeed +2 if rated as Able or Gifted, respectively. Brigade
markers of one Officer figure are used to mark the approximate centre of a Brigade. Usually one PIP
is expended for every 8" distance from the Brigade marker to the Commander. In addition each unit
within the Brigade must be within 2" distance and operate the same move or change of formation.
The LFS factor is added to an individual unit if a commander joins it, to personally lead, or influence
its actions using his 'Le Feu Sacre' - the sacred fire, the unconquerable will to win, or not return.
...I decided to deploy blinds as follows (above), left to right (1) partially deployed Kurassier Bde, (2)
fully deployed Grenadier Bde, (3) column of march dummy blind, (4) fully deployed Light Division.
The plan was to fix the right flank on Liebertwallywitz and send forward the dummy blind to sit on
the hill, observe things and hold up the French, who with their Reconnaisance chip, enhanced
recce status and Grand Tactical chip had a massive advantage on manouevring. The infantry
would hopefully occupy the village and copse behind it, and by forming line and/or squares with the
light cavalry, form a reserve.
My Grenadier Bde would advance to the crossroads and await further orders in an attempt to pin
and delay any the enemy activity in the centre.
My Left flank consisted of the Kurassier Bde who would attempt to roll up the enemy.
This plan was quite risky as the latter two commanders were rated as Cautious meaning they may
well have turned out to be extremely slow and ponderous in their movement.
I had decided to place my C-in-C with the Light Division ensuring that if 'Bold Commander',
'Austrian C-in-C' or 'Austrian Commander 4' was drawn I could ensure that this force was activated
allowing me to occupy Liebertwallywitz. Under the LFS system a C-in-C that is close enough to
another Commander may pass his PIPs onto his subordinate. This is important when your plan
requires your troops to be able to move before the enemy and occupy terrain or take up an
advantageous position.
The disadvantage with this is that the C-in-C would be placed far away from the Cautious
Commanders on the left. By placing my C-in-C near them I could hopefully negate the Cautious
card and its effect upon them by allowing him to pass on his PIPs to them before the Cautious card
came up.
Nige’s French
[c2,400 Infantry, 18 guns, c3,200 Cavalry]
C-in-C – SOLID (DAv, LFS +1)
Light Cavalry Division [1,600 Cavalry] – ABLE/SOLID (DAv+1, LFS +2),
Enhanced Recce Status
Bde
Chasseur a Cheval Regt C Class Light Cavalry
Provisional Chasseur
a Cheval Regt D Class Light Cavalry
Bde
- Hussar Regt C Class Light Cavalry
a Cheval Regt D Class Light Cavalry
Independent Dragoon Brigade [800 Cavalry, 6 guns] – SOLID (DAv-1, LFS +1)
Two Dragoon Regt C Class Line Cavalry
Horse Battery B Class 6 x 8lb Medium Guns HA
Independent Polish Division [c2,400 Inf, 12 guns, 800 Cavalry] – SOLID (DAv, LFS +1)
Bde
Polish Line 1 Btn B Class Sk 2
3 Btn C Class Sk 1
Foot Battery C Class 6 x 6lb Medium Guns
Polish Horse Battery C Class 6 x 4lb Light Guns HA
Bde
Two Regts Polish Uhlans C Class Lancers
FAKE (DAv) Enhanced Recce Status
Kev's Austrians
[9 Btns, 7,800 Inf, 18 Sqdns; 2000 Cav, 3 Btys; 22 guns]
C-in-C - BOLD/SOLID (DAv-1, LFS +1)
Infantry (Light) Division – SOLID (DAv, LFS +1)
[5 Btns; 4200 Inf, 1200 Cav, 16 guns]
Bde
Grenz Regt 2 Btns C Class Sk 2
Two Hussar Regts C Class Light Cavalry
Dragoons B Class
Foot Artillery C Class 8 x 6lb Medium guns
Bde
Line Battalions 2 Btns* C Class Sk 1
2 Btns D Class Sk 0
Foot Artillery C Class 8 x 6lb Medium guns
Independent Grenadier Brigade - CAUTIOUS/SOLID (DAv-1, LFS +1)
[4 Btns; 3,600 Inf, 8 guns]
Grenadiers 4 Btns B Class Sk 0
Foot Artillery C Class 8 x 6lb Medium guns
Independent Kurassier Brigade – CAUTIOUS/SOLID (DAv-1, LFS +1)
[800 Cav]
Two Kurassier Regts C Class Heavy Cavalry
FAKE (DAv)
Cards/Chips
French C-in-C Austrian C-in-C
French Commander 1 Austrian Commander 1
French Commander 2 Austrian Commander 2
French Commander 3 Austrian Commander 3
French Commander 4 Austrian Commander 4
French Grand Tactical Cautious Commander
French Reconnaisance Bold Commander
I rolled randomly for the commanders using the LFS automated character generator (26.1). This is
a very useful aid for quick one off games. Once again a proliferation of Cautious commanders on
the Austrian side revealed their weakness.
A few quick notes upon the LFS system are required I believe for those unfamiliar with this excellent
set of rules.
In LFS, on-table both sides are initially represented by 'Blinds'. These represent the Grand Tactical
aspect and general location of units but not the identity of their units. Commanders can spot blinds
to establish the identity of such blinds. Once spotted the figures are placed upon the table. Blinds
can be column of march (4" frontage by 8" depth), semi-deployed (8" x 4") and fully-deployed (16" x
4") reflecting the general nature of their troops.
Blinds cannot change their status from column of march to fully deployed in one turn.
A big mistake by new players to LFS is to allow your blinds to be spotted whilst in column of march
or semi-deployed. Troops spotted in such formations must be deployed in a series of columns in
base to base contact and necessitating PIPs to be spent deploying properly (individual units in LFS
must have a gap of 1" minimum between them), upon their Commanders card being drawn from the
pack.
Blinds can move 8" if in Column of march, or 4" in an other formation, but are allow multiple moves
if formed enemy are not within 16".
As with IABSM dummy or fake blinds can be used to create fog of war. However, in LFS it is
recommended that such blinds do not exceed 20%. For this game I allowed one per side.
Each Division, or Independent Brigade, is alloted a number and commanded by a General whose
identity is unknown until he is spotted by the opposition.
Also in common with IABSM the LFS system features a drawn card system. Each Commander has
a card (or alternatively poker chip) placed into the pack (bag for chips) which activates his
command each turn. National characteristics chips can be added for flavour.
'French Grand Tactical' allows a C-in-C to activate any blind that has not taken its turn yet to do so.
'Cautious Commander' followed by the next cautious commander prevents any movement by that
commanders troops other than artillery fire and rallying.
The 'Reconnaisance' card is an optional one for games where basically there is a significant
proportion of light troops, usually over 50% of the total. Blinds with enhanced Recce status can
make an additional spot and move but not initiate combat. For this game the only unit with a
substantial amount of light troops was Nige's Light Cavalry Division. I decided to award enhanced
status too to his fake blind, therefore protecting the identity somewhat of his light cavalry, forcing
me to spot to identify which blind is which.
'Bold Commander' card means that if any commander is rated as bold he MUST take his turn when
this is drawn.
LFS differs from IABSM in that spotting is limited to only one attempt per turn and must be at the
beginning of a turn; no move and spot here folks! Also spotting is from the Commander figure not
individual units. It is therefore important that the commander is in a position to see, i.e. not behind a
hill!
Although card driven the LFS system differs substantially from that of IABSM in that there is not
'Tea Break'. In LFS the WHOLE pack of cards is played through each turn.
Units activate under LFS using PIPs which generally are required to move Brigades of individual
units. Each commander rolls an average die (2,3,3,4,4,5) removing one from the score if Poor, or an
idependent Brigade, and adding +1 or indeed +2 if rated as Able or Gifted, respectively. Brigade
markers of one Officer figure are used to mark the approximate centre of a Brigade. Usually one PIP
is expended for every 8" distance from the Brigade marker to the Commander. In addition each unit
within the Brigade must be within 2" distance and operate the same move or change of formation.
The LFS factor is added to an individual unit if a commander joins it, to personally lead, or influence
its actions using his 'Le Feu Sacre' - the sacred fire, the unconquerable will to win, or not return.
...I decided to deploy blinds as follows (above), left to right (1) partially deployed Kurassier Bde, (2)
fully deployed Grenadier Bde, (3) column of march dummy blind, (4) fully deployed Light Division.
The plan was to fix the right flank on Liebertwallywitz and send forward the dummy blind to sit on
the hill, observe things and hold up the French, who with their Reconnaisance chip, enhanced
recce status and Grand Tactical chip had a massive advantage on manouevring. The infantry
would hopefully occupy the village and copse behind it, and by forming line and/or squares with the
light cavalry, form a reserve.
My Grenadier Bde would advance to the crossroads and await further orders in an attempt to pin
and delay any the enemy activity in the centre.
My Left flank consisted of the Kurassier Bde who would attempt to roll up the enemy.
This plan was quite risky as the latter two commanders were rated as Cautious meaning they may
well have turned out to be extremely slow and ponderous in their movement.
I had decided to place my C-in-C with the Light Division ensuring that if 'Bold Commander',
'Austrian C-in-C' or 'Austrian Commander 4' was drawn I could ensure that this force was activated
allowing me to occupy Liebertwallywitz. Under the LFS system a C-in-C that is close enough to
another Commander may pass his PIPs onto his subordinate. This is important when your plan
requires your troops to be able to move before the enemy and occupy terrain or take up an
advantageous position.
The disadvantage with this is that the C-in-C would be placed far away from the Cautious
Commanders on the left. By placing my C-in-C near them I could hopefully negate the Cautious
card and its effect upon them by allowing him to pass on his PIPs to them before the Cautious card
came up.


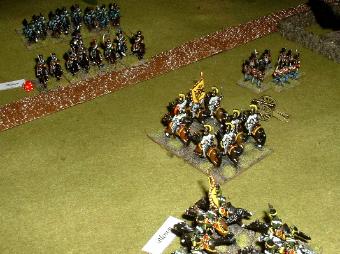
...Nige deployed three of his four blinds across his
table edge, all fully-deployed
The action started with a general advance forward
by the French centre and eastern blinds, towards
the low hill and Liebertwallywitz village.
My Austrians, following their orders moved slowly
forward occupying the woods to the south of the
village and moving upto the base of the hill.
Using the 'Recconnaisance' card Nige's western
blind spotted my Grenadier Brigade moving
forward. I was forced to deploy them on table but
not knowing what I faced, elected to do so in
squares, preuming that enemy cavalry would be in
large numbers.
My Light Division was spotted by the enemy,
making their way forward through the woods and
into Liebertwallywitz. Under LFS a typical built up
area is represented as a 6" square, and can be
garrisoned by only one Battalion. Each BUA can be
allotted a value to indicate the nature of its buildings
and level of preparation. This factor is added to the
garrison during combat.
My dummy blind spotted the French as they
mounted the crest of the hill identifying them as a
Light Cavalry Division.
Artillery fire caused a casualty on the leading
Chasseur Regiment. It was forced to take a
bombardment test for receiving 10% but under 25%
losses; -1, a further -1 per casualty suffered, total -2
to the die roll. A score 0 or less would ensure that
the Chasseurs would become shaken and therefore
vulnerable and unable to charge. They passed with
flying colours. Normally troops within 4" to the rear
of a unit hit will test for casualties due to bounce
through. However the D class Chasseurs in
support were on the other side of the hill so were
deemed to be safe from the roundshot, which
ploughed into the crest of the hill.
The cautious nature of my Grenadier and Kurassier
Brigades was already starting to have an effect as
they began to sit idly by watching the scene played
out infront of them.


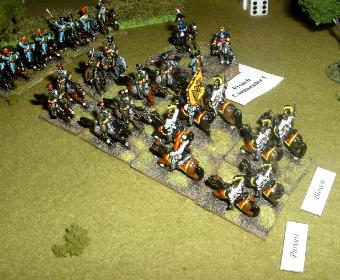
Nige's Light Cavalry spotted my dummy blind and then at the sound of the trumpet the massed
squadrons of Chasseurs began to roll forward on a collision course with the Austrian centre. I had
decided not to deploy my Grenzer Battalion in square, opting instead for column of attack, and so
tested to change formation.
Infantry in LFS have the opportunity to change formation if charged, but require to test to do this. It
is by no means a certainty that they will be able to do so, but better class troops, charged from over
half range have a good chance. I rolled a very low score though and they Grenzers failed and
became disordered!
French scored +3 for combat value (CV) of Light Cavalry Vs Infantry, +2 for 100% overlap, +1 as they
had a supporting Chasseur Regiment within 4" to their rear = 6. French total 6.
Austrian Grenzers scored +3 for column Vs Cavalry, and counted a further +2 for two batteries that
had not fired this turn and could now do so as part of the close combat calculation. Classed as
Disorganised, I now halved my running total of 5 to a measly 2.5 rounded down to 2 .
The French rolled two dice and added the difference in scores. Rolling high the subsequent
calculation when cross referenced meant that my Grenzers routed with 25% losses and the nearby
artillery crews abandoned their guns!
Light Cavalry move 16" under LFS, and so forced to continue their full distance, due to breaking
through and routing my troops, the Chasseurs smashed into my B Class Dragoons sitting in
reserve. Being cavalry of the line, and a whole class better at least, the Chasseurs were forced to
retire shaken and were now considered to be blown. Both of these factors would prevent the
Chasseurs from making any further contribution until their formation was restored and their horses
rested.


Over on the Austrian left, whilst all the action had
been occurring elsewhere, Nigel's blind having
failed to occupy Liebertwallywitz, had withdrawn
out of effective range of my artillery.
Things now changed as the blind revealed
advanced swiftly. Eventually being spotted as the
Polish mixed Division.
The Polish infantry deployed with three Battalion
columns in the first line, supported by a further
Battalion column in the rear. Their right flank saw
the divisional artillery deployed with two Regiments
of Lancers on their right.
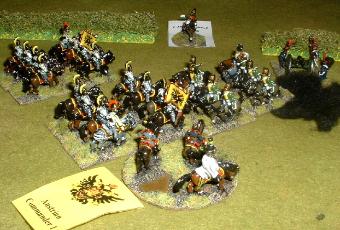
Now the battle was to turn somewhat. The cavalry
scrap, in the centre, continued as the Chasseur
Brigade which had charged the Grenzers
previously, had rallied and recovered.
It went into the attack again, but this time was
routed by Austrian Hussars. The second light
cavalry Brigade, consisting of Hussars and
Chasseurs, attacked uphill, led by its Commander.
The short fight saw both sides break-off with no
casualties. As both sides were more or less blown,
routing or permanently shaken, the centre beacame
a lull.
The Austrian Kurassiers, on the left, charged pell
mell into a Regiment of Dragoons which were
pinning a square of Grenadiers within 4". The
Dragoons managed to turn as the mass of heavy
horse smashed into them but it was too much and
inevitably they were routed taking the Horse battery
with them. The Kurassiers were not required to
undertake a breakthrough move, and did not
pursue.
The French right, Austrian left was now falling apart.
One Regiment of Dragoons were to the rear of the
grenadiers cut off from the rest of their comrades,
with the other routing off table in turmoil.
Time to bring on the Poles!
Nigel's Polish troops now fired an artillery battery
into the village of Liebertwallywitz causing a
casualty on the Austrian garrison and then piled
into the attack, led by their Divisional Commander
fighting in the front rank!
Clearly much had been learned by this relative
newbie to LFS.
The Poles counted;
+2 Basic CV
+2 Outnumber enemy 3:1 (36 Vs 11)
+1 Battalion in support
+1 LFS factor of Commander
+3 Difference in skirmish factors
(Sk 2,1 and 1 = Sk 4, Austrians = Sk1)
TOTAL =9
Austrians;
+2 Basic CV
+2 BUA defence value
- 1 Outclassed
(C Class Vs one B and two C class Poles)
TOTAL = 3
Back in the centre I had ordered my Austrians to
take the hill previously. One Dragoon and two
Hussar units had mounted the crest, pinning the
French Light Cavalry, within 4", to the north of the
high ground.
The French now launched an attack upon my left
most Hussar Regiment with C Class Hussars. The
pinning units on our right flank were negated and
prevented from counting as support. Both sides
withdrew blown with no casualties.
My Austrian Light Division had now been given
orders to repell the Poles from Liebertwallywitz.
However my attack was much less successful and
the Austrians withdrew shaken after losing yet
another firefight with those sturdy Polish chaps.
To make matters worse the Polish artillery now
firing enfiladed into my withdrawing Battalions
routed the nearest unit forcing the others, all within
8" to rout, leaving a paltry, permanently shaken,
33% casualty ridden holding the woods.
Nigel launched his pinned garrison into attack
against this meagre Austrian unit routing it
immediately.
The victory was completed when the Polish Uhlans
had charged my right hand Hussar unit on the hill
and routed it.
Defeat snatched from the jaws of victory by those
bloody Poles again!
The game had been an excellent one and had really
given Nigel a taste of the nature of Napoleonic
warfare when there are lots of cavalry present. I had
therefore acheived my aim.
Casualties had run to 350 French/Poles (6%) and
1,550 Austrians (almost 16%) in almost three hours
of fighting.
Once again the 'Cautious' commander rating had
made its usual effect upon the slow Austrians but I
had made a couple of decisions which were real
howlers.
The game was played at times at a breakneck pace
with very few lulls in the action. 11 turns were
played in two hours.
been occurring elsewhere, Nigel's blind having
failed to occupy Liebertwallywitz, had withdrawn
out of effective range of my artillery.
Things now changed as the blind revealed
advanced swiftly. Eventually being spotted as the
Polish mixed Division.
The Polish infantry deployed with three Battalion
columns in the first line, supported by a further
Battalion column in the rear. Their right flank saw
the divisional artillery deployed with two Regiments
of Lancers on their right.
Now the battle was to turn somewhat. The cavalry
scrap, in the centre, continued as the Chasseur
Brigade which had charged the Grenzers
previously, had rallied and recovered.
It went into the attack again, but this time was
routed by Austrian Hussars. The second light
cavalry Brigade, consisting of Hussars and
Chasseurs, attacked uphill, led by its Commander.
The short fight saw both sides break-off with no
casualties. As both sides were more or less blown,
routing or permanently shaken, the centre beacame
a lull.
The Austrian Kurassiers, on the left, charged pell
mell into a Regiment of Dragoons which were
pinning a square of Grenadiers within 4". The
Dragoons managed to turn as the mass of heavy
horse smashed into them but it was too much and
inevitably they were routed taking the Horse battery
with them. The Kurassiers were not required to
undertake a breakthrough move, and did not
pursue.
The French right, Austrian left was now falling apart.
One Regiment of Dragoons were to the rear of the
grenadiers cut off from the rest of their comrades,
with the other routing off table in turmoil.
Time to bring on the Poles!
Nigel's Polish troops now fired an artillery battery
into the village of Liebertwallywitz causing a
casualty on the Austrian garrison and then piled
into the attack, led by their Divisional Commander
fighting in the front rank!
Clearly much had been learned by this relative
newbie to LFS.
The Poles counted;
+2 Basic CV
+2 Outnumber enemy 3:1 (36 Vs 11)
+1 Battalion in support
+1 LFS factor of Commander
+3 Difference in skirmish factors
(Sk 2,1 and 1 = Sk 4, Austrians = Sk1)
TOTAL =9
Austrians;
+2 Basic CV
+2 BUA defence value
- 1 Outclassed
(C Class Vs one B and two C class Poles)
TOTAL = 3
Back in the centre I had ordered my Austrians to
take the hill previously. One Dragoon and two
Hussar units had mounted the crest, pinning the
French Light Cavalry, within 4", to the north of the
high ground.
The French now launched an attack upon my left
most Hussar Regiment with C Class Hussars. The
pinning units on our right flank were negated and
prevented from counting as support. Both sides
withdrew blown with no casualties.
My Austrian Light Division had now been given
orders to repell the Poles from Liebertwallywitz.
However my attack was much less successful and
the Austrians withdrew shaken after losing yet
another firefight with those sturdy Polish chaps.
To make matters worse the Polish artillery now
firing enfiladed into my withdrawing Battalions
routed the nearest unit forcing the others, all within
8" to rout, leaving a paltry, permanently shaken,
33% casualty ridden holding the woods.
Nigel launched his pinned garrison into attack
against this meagre Austrian unit routing it
immediately.
The victory was completed when the Polish Uhlans
had charged my right hand Hussar unit on the hill
and routed it.
Defeat snatched from the jaws of victory by those
bloody Poles again!
The game had been an excellent one and had really
given Nigel a taste of the nature of Napoleonic
warfare when there are lots of cavalry present. I had
therefore acheived my aim.
Casualties had run to 350 French/Poles (6%) and
1,550 Austrians (almost 16%) in almost three hours
of fighting.
Once again the 'Cautious' commander rating had
made its usual effect upon the slow Austrians but I
had made a couple of decisions which were real
howlers.
The game was played at times at a breakneck pace
with very few lulls in the action. 11 turns were
played in two hours.


My Grenadiers advanced slowly forward, 2" in their squares. Previously, the close proximity of an
enemy blind led to it being spotted automatically, no dicing required, revealing it to be a blind.
Feeling safe I decided to manouevre my rearmost Grenadier battalion into a column and reinforce
my weakened centre.
My Kurassier Brigade was spotted by Nigel's reserve blind which had advanced from off-table the
previous turn. The blind continued its advance to support the flank of the French Light Cavalry
Division.
The Kurassiers chip came next however, and acting on orders at last they began to cross the
shallow stream infront of them spotting the enemy blind as a Brigade of Dragoons, supported by
horse artillery.
The next turn prevented my Grenadier Brigade from moving or changing formation as the 'Cautious'
chip came up. This had massive connurtations as the enemy Dragoon chip came up straight
afterwards. The French horse artillery fired cannister into my nearest square of Grenadiers adding a
bonus to its firing dice score, to reflect its B class, causing four casualties! Luckily I rolled high
enough to pass the bombardement test. Nigel's Dragoons had orders to attack the grenadiers but
as they were still as yet unshaken and forced one regiment of the enemy cavalry to halt at 4".
The second regiment of Dragoons could now by-pass the enemy squares and just had the range to
attack my Grenadiers in their oh-so-nice Column - in the flank!
I tested to form square/turn face and failed miserably, my brave Grenadiers becoming disoredered
as the Dragoons smashed into them. Not surprisingly the Grenadiers routed but as the Dragoons
were at the very end of their 12" permitted movement no breakthrough movement was required. In
addition the Dragoons did not roll the required 6 to allow pursuit.
Liebertwallywitz 1813
Liebertwallywitz
Low Hill
Stream
Boggy ground
Copse
Small Copse
French
Austrians
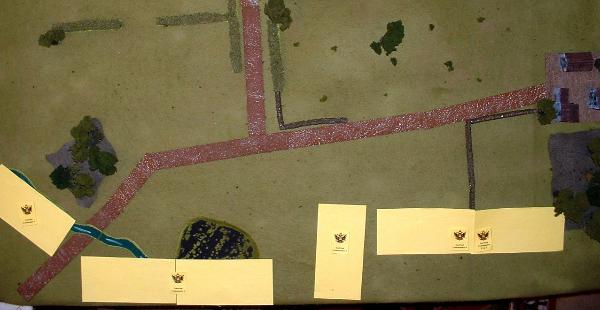
1
2
3
4

The Poles rolled a 2 on 2d6. A firefight ensued. Musketry in LFS is abstracted and takes place as a
result of a combat outcome such as above. Both sides took two casualties each and the rolled a
further D6 each. The Poles scored higher and so inflicted a further casualty of the Austrians who
withdrew into the BUA. Nigel now could send one Battalion into the BUA.
The subsequent turn saw the Poles win again as the Austrians were now devoid of their BUA
defence value and had taken over 25% casualties. The Austrians withdrew from Liebertwallywitz
and the Poles were resplendent in their triumph!